Wednesday, January 27, 2016

How to Make a Gemstone and Silver Necklace

Heyyy guys,

I haven't written a blog post in a while.  I was pretty busy: got married, changed careers, experimented with red-blond hair for a while. Two of the three weren't mistakes.  

But now I am back, brunette, and here to teach you how to make a really pretty fluorite heart and sterling silver necklace for not a lot of money.  All supplies were purchased on Etsy from JW Beads and RiverSong Beads about a year ago, so prices may have changed in the meantime. If you're a beginner and don't want to invest in silver and semiprecious beads to make a necklace that you may mess up, then you can find glass beads and silver-colored wire for a lot less money.


Supplies and Equipment:
Start with:
  • 9 fluorite heart beads, 6mm size 
    • Price: paid $10 for 65 beads, so about $1.40 
  • 16-18" of silver chain
    • Price: paid $10 for 5 feet so about $3
  • 12" of half-hard 22 gauge silver wire
    • Price: paid $9.60 for 5 feet so about $1.92
  • one spring-lock clasp
    • Price: $0.75 
Total price for this necklace: $7.07


For Equipment: You will need one pair of needle-nose pliers (left) and wire cutters (right)

Step one: use the wire cutters to cut off two pieces of 22 gauge hard silver wire about 0.5" long


Use your needle-nose pliers to twist one half of the wire into a loop, making sure not to fully close it. Then repeat on the other side to make an S shape.


Loop your S into the spring-lock clasp, as shown below. Then using the pliers, press the loop connected to the clasp closed.  Connect the other part of the S to the end-link of your chain and press the loop closed. Now your S should look like an 8.


Take the second piece of wire and fold into an S, then close on one side.  The the other side and attach to the last link on the other end of the chain.  Use the pliers to close it into an 8.  Now you have a necklace chain! Feel free to play around clasping and unclasping the chain. Or not, because of course you're not that immature.


OK, now you are going to set up your 0.7" pieces of wire to fit your beads. Spiral 5 pieces of the wire with the spiraled bottom (left). These are going to be the end heart in each chain.  Create loops on the end of the other 4 pieces just a little bit smaller than the loops on the 8s you did.  
Now line up the beads in the design that you want. I chose a drop-style necklace so that 
the focal point is a line of three hearts, with two rows of two hearts on either side, and then one drop heart at each end.  Cut 9 pieces of silver in 0.5" lengths (left pile) and 9 pieces in 0.7" lengths (right pile) 


Slide the hearts on and close the loops. Then admire your handiwork. Don't you feel great about yourself?  You deserve a spoonful of Nutella. I will wait.


Repeat for all of the beads and then line up again.  All of your 0.7" pieces of silver should be gone now, leaving just your 0.5" pieces.  You are going to use these to make the same connecting S pieces that you did for the chain.


Link them together like below, and then turn the S pieces into 8s.  Connect each line of hearts carefully to your chain.  Make sure to count the links on each side of center so that your necklace is symmetrical. I spaced each drop-chain of beads 12 links from one another.


When you are all done connecting, it's time to celebrate - you just made a gorgeous necklace! Drink some champagne, quit your day job. Steal a boat.


Wednesday, February 26, 2014

Turn Old Curtains into a Tote Bag


When I was 20 years old and had just moved into an apartment style dorm with one of my friends, I made one of the first "grown up" purchases of my life - two sets of beautiful, filmy green curtains that were on sale at Marshall's.  Almost four years later, and it's time for me to say good bye.  We are replacing them with less beautiful (but more practical) energy efficient curtains to help with our exorbitant electricity/heating bill. Because I'm no good at saying goodbye to things for real, and because I never like things to go to waste, I decided to transform them into a tote bag.

Materials
Because my curtains are filmy, I needed about one yard of base fabric to give strength to my bag. I chose undyed muslin from Joann that sells for $1.99 per yard. If you want a bag with a bit more structure, I would recommend using canvas as your base; I did this a few years ago and it came out as a great, heavy duty bag for lugging groceries. Also, for the pockets and strap, you will need either lace like what I used, or a color/texture of fabric that complements your curtains. I used 0.25 yards of the same lace I used for the scarf in my last post, which comes to $1.50. Because I'm recycling my curtains, that means that this project comes to a grand total of $3.50.

If you don't own a sewing machine, this is possible to do by hand sewing - I have in the past. However, it's a terrible experience that will make you want to kill yourself/other people/possibly me so I do not recommend it.

Step One
Decide how large you want your bag to be: I need a larger tote for my day to day because I carry a lot of stuff with me  If you want to try for a mini tote or a handbag instead, now is the time to decide.  Once you've decided, add about an inch to each side of your rectangle, and cut out four pieces of curtain fabric and two pieces of muslin. Iron everything smooth.  Because of how delicate my curtains are, I ironed on low setting.


Step Two:
Time to break out the lace! Cut out two rectangles of lace, curtain, and muslin to be your pockets.  Hem them, then pin and sew onto a layer of curtain and muslin, pinned together.  This will be the front of your bag.  When you place the pockets on your bag, keep in mind that seams are going to eat up anywhere from 0.5"-1.0" of outer fabric, so don't pin them too close to the edges. Also, make sure to place them at least 2.5" from the bottom of your cloth.


Step Three:
You're going to sew the outer layer of your bag before the lining: Line your fabric up so that you have two curtain pieces in the middle with the good sides (the side with pockets, for your front piece) facing in, and one piece of muslin on each side, like a sandwich with lettuce in the middle. You will have two pieces of curtain fabric left over to use for your lining later. Pin your layers together and sew the two sides and the bottom of your bag.  Leave the top side of your bag unsewn. Then, turn your bag right side out so that the raw seams are on the inside.


Step Four
Take your remaining two pieces of curtain fabric and pin so that the good sides are in the middle, then sew the same way as you did for step three.  Leave inside out.


Step Five:
Put your outer layer of your bag inside the lining you just sewed.  Pin along the top, then sew all the way around, leaving about two inches at each end of your bag.  When you're done sewing the top, go to one of these holes and pull the insides of your bag through it.  When you're done, your lining will be in the middle and your shell will be outside; there should be no raw edges showing except at the two holes of each end of the top.Then take your bag and flip it inside out. Flatten the corners so that you make triangles and sew across at about the 2" mark.  If you want a shorter, wider bag, sew further down so that you have a bigger triangle.


Step Six
You're finally ready for the strap! Cut three pieces of curtain fabric, three pieces of muslin, and one piece of lace, to be 1" wider and 3" longer than you want your finished product to be. Hem all three straps, then overlap the ends and sew in one place.  Braid your strap, making sure that you keep the no so pretty side of the strap on the inside of. Sew the ends in place once you're done with your braid.

Step Seven
Finally, last step :) Pop one end of your braid in each hole you left in the top of your bag. Pin it into place and try on, to make sure it fits right.  Then hand-sew the edges of your bag shut, sewing the braid into the lining of the bag.  This is quite a few layers, so you may want to have a thimble ready, unless you enjoy being stabbed repeatedly in the thumb.

It was a long project, but now all you have to do is enjoy your bag.


Happy sewing, fashionistas :)


Thursday, February 20, 2014

DIY Crochet and Lace Scarf


Hello lovelies,

It seems like winter is never going to end, ever ever ever.  Next week it's going to plunge once again into unseasonably cold temperatures, so I thought I would beat the weather and stay warm with a crochet infinity scarf.  My camera was in the process of dying a slow, sad death as I did this project, so please excuse the poor quality photos - I now have a beautiful new camera so stay tuned for fabulous photos on my next post.

What you'll need for this project: yarn, a crochet hook, and lace. I used a chunky green yarn that I have had lying around for years, and crafter's lace from Joann Fabric.

Step One:


Loosely crochet a chain long enough to fit around your neck.  Make sure it's about 2-3 inches shorter than you want for your finished scarf - when you double crochet later on, the stitches will stretch a bit.

Step Two


Double crochet your  scarf a total of eight rows, going back and forth along the chain. This will create a subtle stripey pattern.  Feel free to do more or less than eight rows depending on how think you want your scarf.  When you cut your yarn, leave a twelve inch strand of the end after you tie off.

Step Three:


Take your crafter's lace and cut into half inch strips about 1.5 times the length of your scarf.  I used clear fingernail polish on the ends to keep them from fraying instead of high end anti-fray sealant which can be expensive.  You can also buy lace on a spool of course, but crafter's lace is only $5.99 per yard, so it's a lot cheaper per square foot.

Step Four


Just like my crochet and ribbon hat, I'm using bobby pins in a fun (frugal) way.  Thread your lace through your bobby pin, and add a know to secure it.  Weave it along your scarf in any pattern you would like. I chose a basic, straight pattern of three long stripes but feel free to let your creativity go wild - you could thread diamond shapes, braids, even calligraphy if you wanted to.


Step Five


Tuck the lace ends under and pin into place at the end of your scarf, and sew them securely; I did about 5 stitches per end. Once you've sewn up all of your lace ends, take the excess twelve inches of yarn I told you to leave on the end of your scarf, earlier. Take your bobby pin (or, if you're feeling fancy, a yarn needle) and put it on the string. Sew up the two edges of your scarf  like you would one lace up one shoe lace, and knot off when you reach the end.   Your finished product should look something like this:


Stay warm and happy crafting, everyone :)


Thursday, February 13, 2014

DIY Freshwater Pearl Earrings

As you may or may not know (or care), I am getting married next year!  So a lot of my DIY projects coming up will be wedding related, but you don't have to be getting married to find them useful.  For example, today's DIY project is how to make freshwater pearl earrings.  I'm going to be making these for my bridesmaids, but they'd be cute on a date, or out with friends, as well.  If pearls aren't your thing, sub in any kind of fun bead on the end to make it work with  your style.

The Project


So, I like these earrings for a few different reasons.  The first is, it's a simple style.  Because this is the first DIY jewelry post I'm throwing at you all, I figured that an easier project would be good to start you out with.  Simple also is good for me, because I'm going to be making three pairs, and six earrings can be tedious if you choose something intricate.  

The Materials

Unlike my last post, this project does require an investment, but the great thing about it is that you will have supplies left over for future projects.  
I spent about $34 total on supplies, but I'll be able to make more than just these earrings, plus I chose higher end materials like freshwater pearls and sterling silver wire.  For a more budget friendly approach, try it with a metal alloy and glass pearls. I'm providing links to the products I bought for your reference (no, they are not affiliated with me). 
So, as you see, it's a steep investment, but I'll have leftover pearls, one extra pair of earring hooks, and leftover wire for future projects.  The most expensive part of the project were the pliers which I already owned, but included so you could estimate how much it would cost for a beginner. 

Step One

If you're feeling brave and ready to try, here's how to begin:
Take your wire cutter from the package of pliers, and snip off about 0.5" of your wire.  

Step Two


You want to use your needle nose pliers to grip one end of your wire, and the roll the nose until you have a loop touching the center of the wire.  Do the same thing to the other end, but leave a small gap between the edge of the loop, and the wire, so that it looks like an open 8.


Step Three

Link the open part of your wire loop with the earring hook, then use your pliers to press the loop together.  Add another 8 to the first one, and repeat until you have six linked onto one other in a chain.

Step Four

Once you have all six links done, cut a longer piece of wire; this is going to hold your pearl.  Twist the bottom into a smaller loop than usual - you won't need to fit a piece of wire through it, it's just to keep the bead in place.  Once your pearl is on the wire, twist the top into a loop just like you did for the links of your chain,  Connect it to the bottom link, and close with your pliers.

Step Five

Now you have the back part of your earring complete, and it's time for the front - you're over halfway there!
Add three links to your earring hook, and make sure that you add the top link so that it will be in front of the first chain, when you are wearing the earring.  Add the final pearl to the bottom of the three links like you did.  Congratulations, you did your first earring!  Now just do it all over again, and you've got a fab and classy pair of pearl dangles that would go great with a LBD...or a bridesmaid dress, as it happens :)


Happy crafting, fashionistas :)

Sunday, February 9, 2014

DIY Crochet and Ribbon Hat

DIY Crochet and Ribbon Hat


Hello fashionistas, it's been a long time.  Well I'm back, and I'm doing a blog on one of the most frugal and fashion forward things that broke girls can do - an awesome DIY project that looks cute and costs less than $4.00 - a crochet and ribbon hat. 

Supplies

You don't need a lot of supplies to make this hat: just yarn, scissors, a crochet hook - I used size 8 - and a spool of ribbon you'll see later (I may have forgotten to include it in this photo).   The yarn was $3.00 at Joann Fabric's on a sale, and the ribbon was $0.88 at Wal Mart, so if you already have a crochet hook and scissors, you'll be able to do this project for $3.88.

Step One


The first thing you want to do is chain 6 stitches.  If you are a crochet newbie, I found a video on YouTube called Crochet Guru that will take you through the steps http://www.youtube.com/watchv=GjoVWbYhWuc 

Step Two

Once you have the chain of 6, you're going stick your crochet hook through the first stitch, cross your yarn over, and chain one more, so that you have a circle. 

Step Three

Double crochet eight stitches inside the loop.  Again, for all you newbies at crochet, watch this video to learn how to double crochet http://www.youtube.com/watch?v=5xKssKskNzo .  


Then you're going to keep crocheting outward in a circle - crochet two stitches into every hole going outward until your circle looks like the above photo - then crochet two stitches into one hole, and one stitch into the next.   Gradually add more and more single stitches in each hole between the double stitches.  You want your spiral to gently curve up at the ends. 

Step 4

When you put your spiral on your head and one edges touches the front and one edge touches the back, you should start turning the sides of your hat upward.  Double crochet one stitch in each hole, and your hat will start resembling a shallow bowl.  Your hat should fit a bit loosely on your head - the ribbons will tighten it a bit later.  

Step 5

Once your hat is your desired length, do two single crochet stitches and then tie off, and tuck the excess yarn into the stitches.  Congratulations you have made the hat, part!  If you're sick of this project and hating life, you can just wear it as is, and be proud of your beautiful hat :).  If you want to embellish with a bit of ribbon, then read on.

Step 6

Thread your ribbon onto a yarn needle or, if you're an extra frugal fashionista like myself and won't buy a yarn needle, then tie it to a bobby pin.  Thread your ribbon through the hat at the point where you tied your yarn off, then basket weave through each hole. 

Step 7

One you've done an entire row, make sure you skip a row going up, and basket-weave another row.  Keep going on like this, skipping a row in between each one you put a ribbon through, until you reach the top of the hat, where you started out. 

Step 8

Enjoy your fabulous hat!  And if you make one, let know how it turned out in the comments.

Happy Crocheting, fashionistas :)

Wednesday, April 24, 2013

Rock Mother's Day for $20 or Less

We all love our mothers, and Mother's Day is a time when we really want to show them how much we care with a sweet, thoughtful gift.  However, for those of us out there who are broker than broke, this can be a challenge because most cheap Mother's Day presents are tacky and low quality.  Here are three excellent finds for Mother's Day for under $20, so that you can give your mom a classy gift on your tight budget.

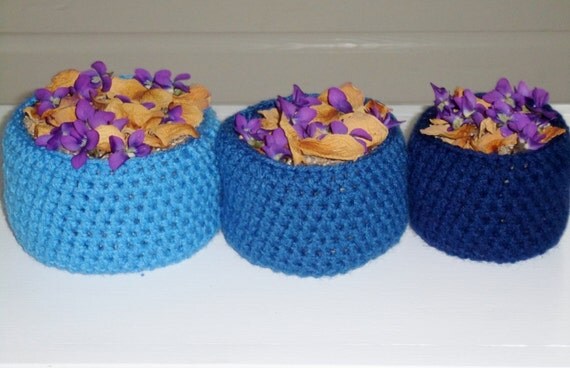
Nesting Baskets:

Hand crocheted nesting baskets are a fantastic gift to give your mother because they are decorative, functional, and just plain pretty.  Fill them up with her favorite candy, tea, or potpourri, and you have a budget friendly gift that your mom is sure to love. These stolenheartcrochet baskets are only $12.00, and are guaranteed to arrive in time for Mother's Day.  Find them here: https://www.etsy.com/listing/130129895/blue-crochet-nesting-baskets

Decorative Planter


Mother's Day and flowers are intrinsically linked, so flowers always make a wonderful present for Mother's Day.  Instead of spending the bulk of your budget on expensive cut flowers that die quickly, why not buy a pretty planter, and put in your mom's favorite flower or herb?  This Dragonfly pot by Clay Garden Pottery makes for a lasting, beautiful gift, and it's only $18.50 at http://www.etsy.com/listing/124482222/dragonfly-pottery-planter-w-attached?

Tea

 Nothing is more soothing than a hot cup of tea in the evening and let's face it, with all of the headaches we cause our mothers over our lifetime, the least we can do is also give a bit of comfort.  This loose leaf Blueberry White Serenity tea by Teaganic is the perfect way to let your mom know you love her - bake a plate of cookies to go with it, and she has the makings of a relaxing afternoon of tea and cookies.  Buy it for $6.00 here: http://www.etsy.com/listing/117187575/loose-leaf-tea-blueberry-white-serenite?ref=br_feed_39

Happy Mothers Day, Fashionistas :)